Google Slides can be an excellent tool for creating unique and customised certificates, even if it may seem like something that’s better left to professional tools. Although its main function is to create presentations, Google Slides provides an open platform for customisation. This article, step-by-step explains how to make certificates using Google Slides.
Step 1:Open Google Slides By Searching In Google
Log in and open Google Slides.You must have access to Google Slides in order to begin. Signing into your Google account is the first step. It’s simple to create an account if you don’t already have one. To sign up or log in, just put “Google Slides: Sign In” into your browser and follow the steps.Accessing Google Slides is much simpler for those who are already logged into a Google account; simply visit the Google Slides site. You are prepared to start the creation process once you arrive.Accessing Google Slides is much simpler for those who are already logged into a Google account; simply visit the Google Slides site. You are prepared to start the creation process once you arrive.
Step 2 : Create a New Project
Now that your account is prepared, you may start a new project. This step is simple: locate and click the “+” button located in the lower-right corner of the screen. By doing this, a blank slide that will appear as your certificate’s canvas will open. You may now start creating and

customizing your layout. Click on the text area in the upper-left corner to give your project a name to help you stay organized. You may call it a “Workshop Certificate” or a “Certificate of Achievement.”

Step 3: Create a Unique Background for Your Certificate
The excitement begins with the background design, and based on your preferences and skills, you may select from a few options. Changing the background by hand is the first approach. Select Slide > Change Background to accomplish this. You may choose a background color, add a picture, or change the theme completely in the box that appears. For example, you may choose a gradient hue or a subtly textured image as your background if you want to add a professional touch. For a modern and professional appearance, we used a blue background for this example,Another option is to utilize an already-existing theme. A sidebar will show up on the right side of your screen when you select

Menu > Slide > Change Theme. There are many templates in this menu, each with its own layouts, color schemes, and styles. Select the one that most closely fits your certificate’s topic. These choices offer a solid basis for your imaginative ideas.
Step 4: Add Decorative Designs to Improve

Although the background establishes the tone for your certificate, Make it seem better. By adding images, symbols, or other visual components that complement the goal of your certificate, you may improve its appearance. For example, look up nice pictures that go well with your design online, such as borders or themed symbols. Drag and drop the suitable pictures onto your presentation when you’ve located them. Your certificate gains significance and style from the thoughtful placement of these elements, which also produces an eye-catching design.
Step 5: Add Text To The Certificate
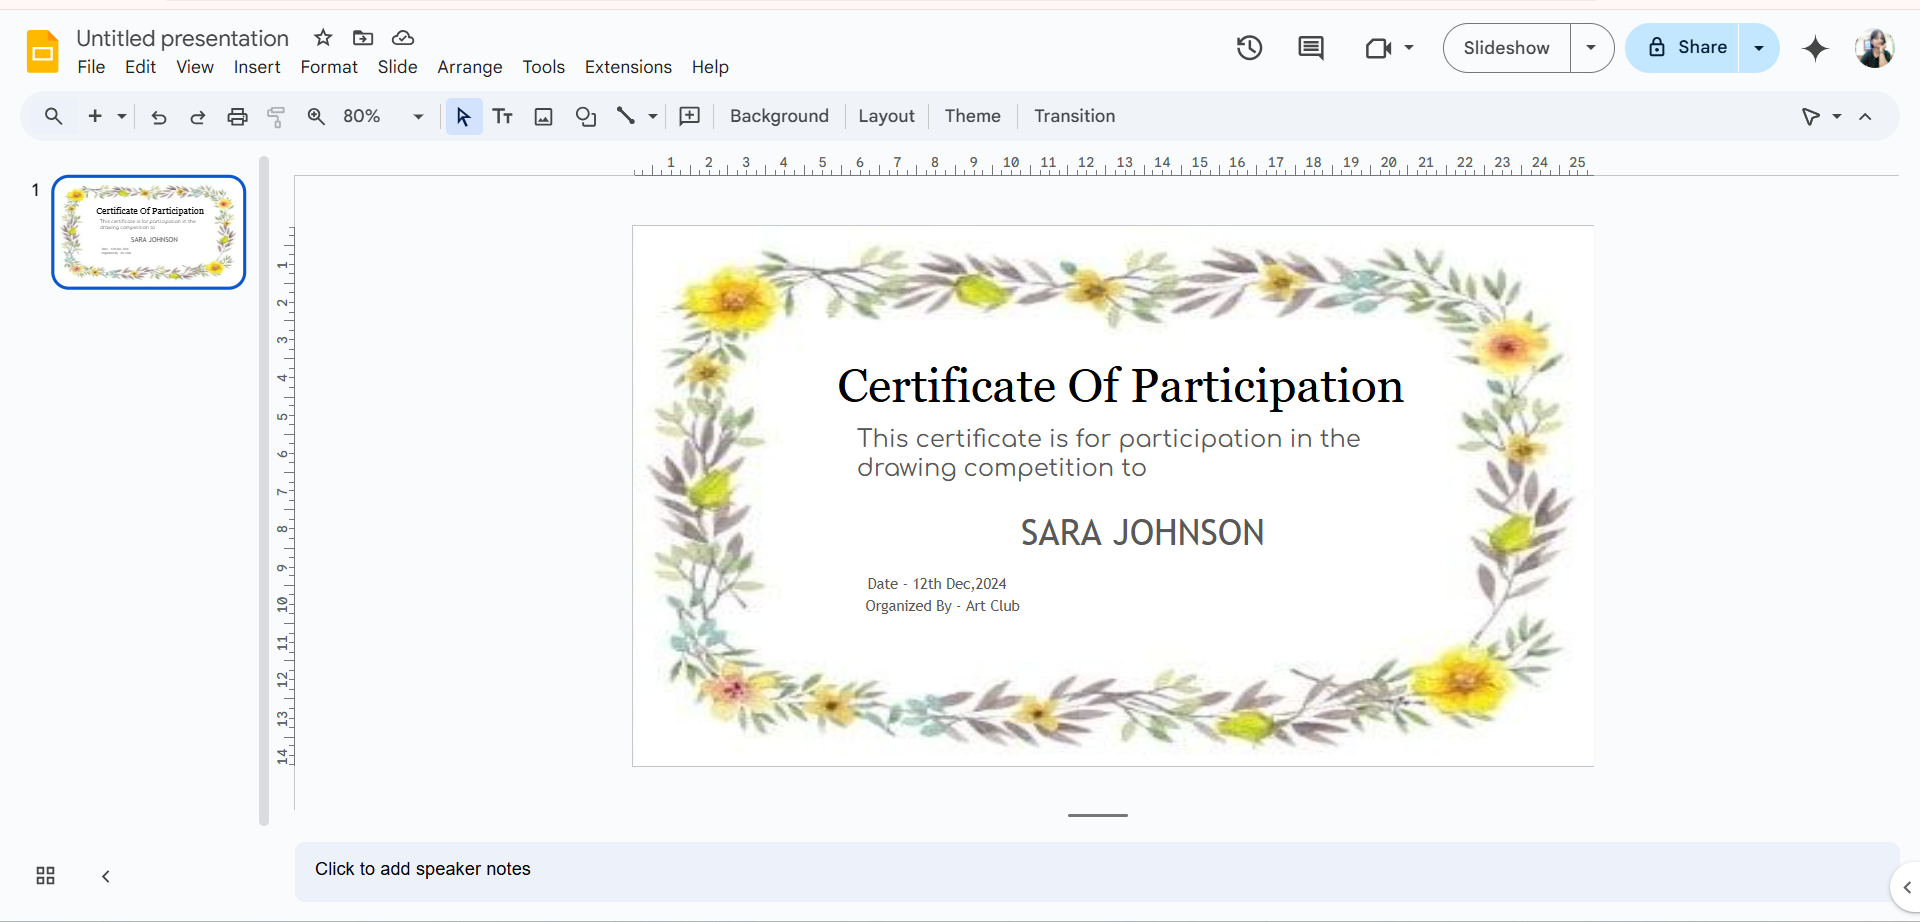
Your certificate’s form is the basis of it, and this is where you customize it for the person who receives it. Start by creating text boxes for the relevant components, such as the recipient’s name, the date of issue, the title of the certificate (for example, “Certificate of Completion”), and any other information that is required. Use strong formatting and a larger font size to make sure the headline is noticeable. The certificate’s validity term, the achievement or event it celebrates, the name of the providing authority, and their signature are the further details you should include. The certificate might seem more significant if you add a personal touch, like a thank-you card or an event-related phrase.
Step 6: Download Your Certificate and Distribute It
It’s time to save your design once you’ve finished it. Choose your desired download format by going to Menu > download > Download. To guarantee that the quality is maintained when shared or printed, we recommend downloading certificates as PDFs. You can give the certificates to recipients once the file has been saved. Email is frequently the simplest way to share digital certificates, and sending a high-quality PDF attachment guarantees that it is usable right away.

In general , Google Slides is an excellent tool for creating certificates. But for additional requirements or advanced features, you might want to look at specialized solutions like MixCertificate By MixCommerce , which offer simplified procedures and are experienced in certificate creation.
For Google Slides certification, is there another option? This is the MixCertificate By Mixcommerce !
A flexible and easy-to-use platform for reproducing and customising expert digital certifications is MixCertificate By MixCommerce. It is ideal for educators, event planners, and corporations because of its various templates, generating capabilities, and smooth email distribution. In addition to having features like digital signatures , certificates may be customized to match the visual identity of your company. MixCertificate, which is made for simple social media sharing, increases company awareness while assisting you in acknowledging. Visit MixCertificate by MixCommerce to examine its features and the certificate procedure. It is a digital method for creating and verifying certificates, MixCertificate is created to make the whole certificate process more efficient. Bulk certificate production, customized templates, quick distribution by automatic email or secure download links, and a web-based platform that can be accessed from any internet-connected device are just a few of its advantages. Furthermore, MixCertificate offers certificate verification via digital badges, role-based access control, data analytics, social media sharing options, and an integrated Verification API.

Businesses, educational institutions, and event planners wishing to effectively handle and distribute certificates may find this platform very helpful. By automating certificate procedures, adding credibility with verification features, and providing customized certificate designs, it increases productivity and guarantees that recipients value what they have achieved.